Field Permissions, Field Order, and Every Airtable Field Type
Field permissions are now four independent settings (view, create, edit, required), fields have one drag order across every surface, and every Airtable field type is supported. What changed and how to use it.

Three changes landed this week, and they are all about the same thing: control over individual fields.
Field permissions used to be a four-step waterfall: hidden, then view only, then editable, then editable and required. Each step contained the one before it, so there were combinations you simply could not express. Now every field has four independent switches. Fields also have an order you set by dragging, and that one order drives every surface in the portal. And every Airtable field type is now supported, including the nine that used to be invisible.
Four Switches, Not One Ladder
Each field in a table has View, Create, Edit and Required, and none of them depends on another.
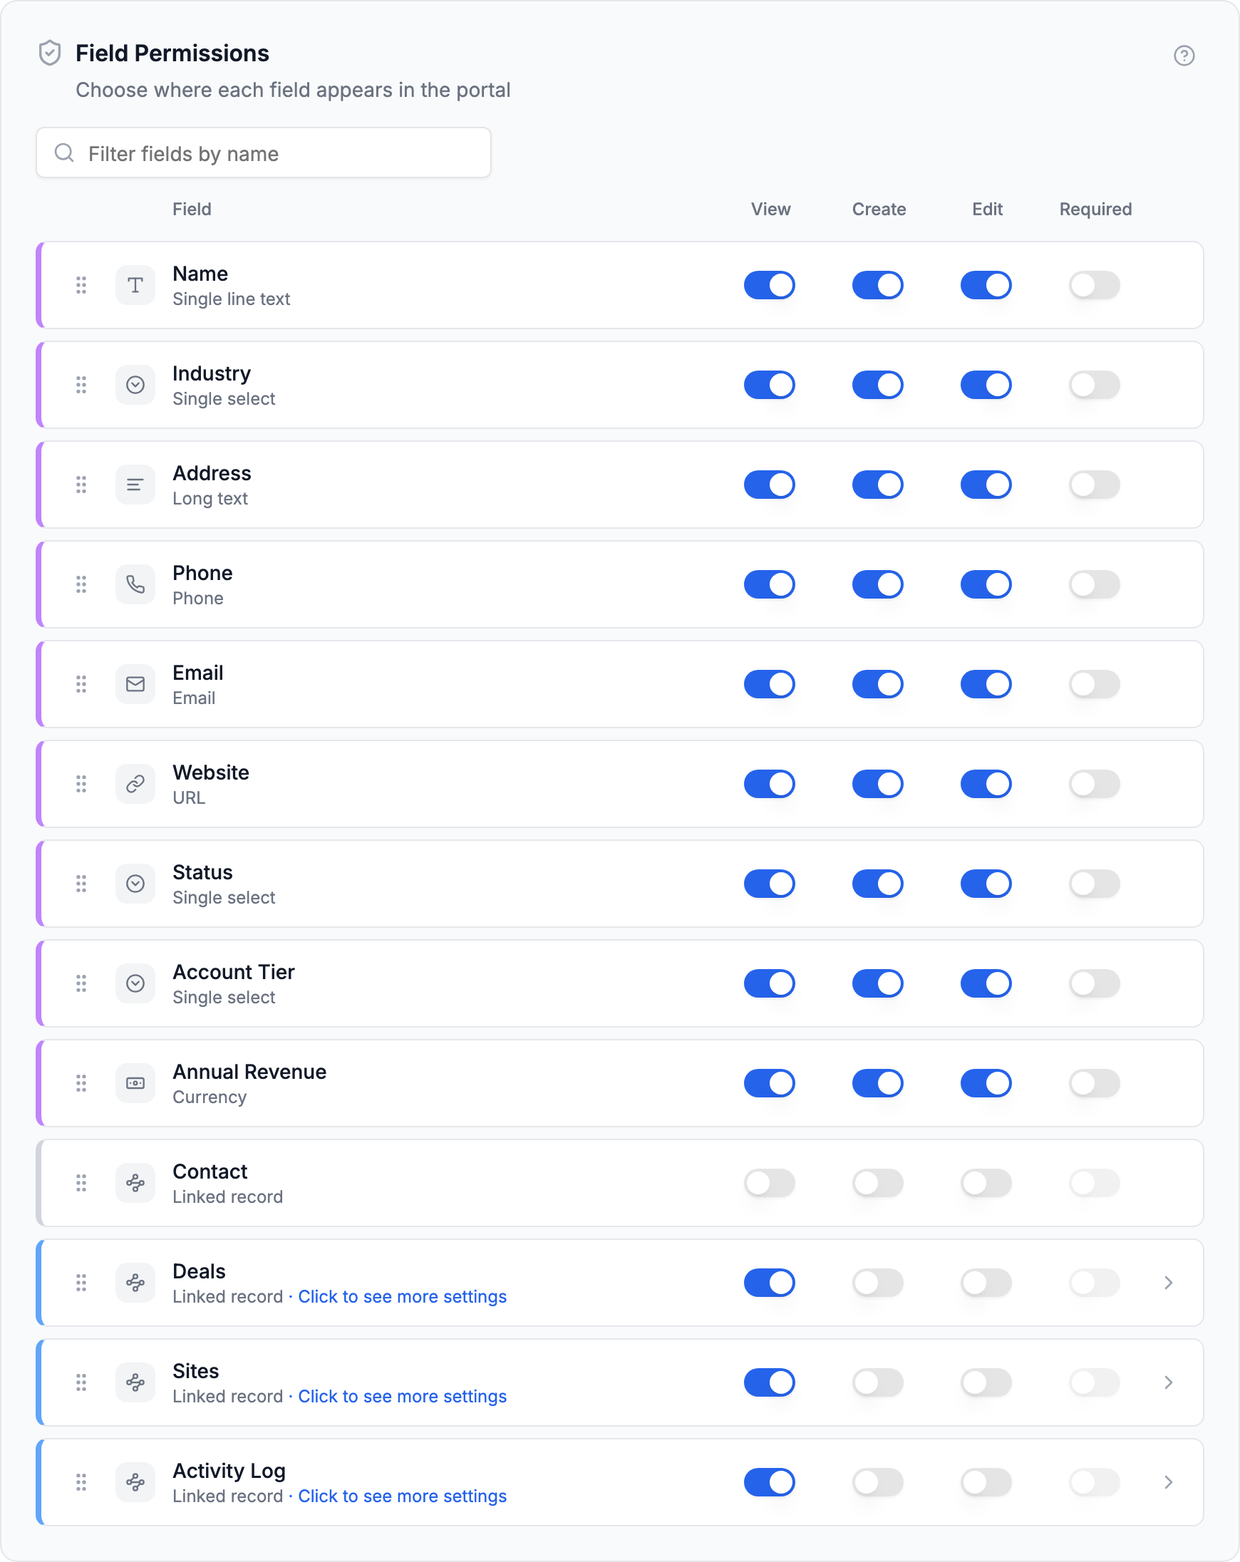
- View shows the field in the table, on gallery, kanban and calendar cards, and on the record detail page.
- Create puts it on the create form, and on the sign-up form if the table is your user table.
- Edit puts it on the edit form.
- Required applies on whichever of those forms the field appears on.
Because they are independent, the combinations people kept asking for now work:
Edit without View. A table has First Name, Last Name and a calculated Full Name. Show only Full Name on the table and detail page, and collect First and Last on the forms. The user never sees three name fields at once.
Create without Edit. A write-once field. The user sets a reference number or an intake date when they create the record, and it is locked from then on.
Edit without Create. A field your team fills in after the record exists, like Status or Owner, so the intake form stays short.
Required on create only. Turn on Create and Required but not Edit, and the field is mandatory at intake and never asked for again.
One caveat worth stating plainly: Create or Edit without View is a layout choice, not a way to keep a value secret. The form input still shows the current value to whoever opens it. To keep a value away from portal users, switch everything off.
One Order, Everywhere
Field order used to be whatever order Airtable returned the fields in, with no way to change it. Now you drag a field by the handle on its row, and there is one order per table that every surface follows: table columns, gallery, kanban and calendar cards, the record detail page, the create and edit forms, and the sign-up form.

The field pickers on the Display tab still decide which fields each view shows. They no longer decide the sequence, so you arrange a field once rather than per view.
Fields you add in Airtable later land at the end of the order rather than in the middle of it, so a new column never quietly interrupts a sequence you arranged.
On a table with a lot of fields there is now a Filter fields by name box above the list, so changing one field's permissions does not mean scrolling to find it.
Every Field Type
Nine Airtable field types used to be invisible in portals: not just unsupported for editing, but absent from the admin field list and impossible to surface at all. Count, rich text, duration, barcode, single and multiple collaborator, button, AI text and sync source are all now supported.
- Rich text renders its formatting: bold, italic, headings, lists, task lists, quotes, code and links. Editing is Markdown, which is how Airtable stores it.
- Duration shows in your field's format, so
1:30reads as an hour and a half underh:mm. - Barcode shows the scanned code, and carries the symbology through unchanged when the text is edited.
- Count, button, AI text and sync source are computed by Airtable, so the portal shows them and never writes them. Their Create, Edit and Required switches are greyed out.
- Collaborator fields are read-only too. Airtable only accepts a write to them from a collaborator on the base, and your portal users are not collaborators. Worth knowing that these fields can show a colleague's email address to your end users, so check before turning View on.
All of them start hidden. Widening what a portal can show never changes what an existing portal does show, so nothing appeared in your live portals when this shipped. Full reference in Supported Field Types.
Who This Helps
Per-field control matters most where one table serves people who should see different slices of it:
- Client portals: show the client their project fields, keep internal margin and notes off the record entirely.
- CRM portals: let a contact update their own details while Status and Account Tier stay read-only.
- Insurance portals: collect claim details at intake, then lock them.
- Contractor compliance portals: make insurance expiry required on the sign-up form and never ask for it again.
How It Compares
Field-level permissions are the dividing line between portal tools, and where they sit in the pricing is usually the story. Noloco does have create, read and update permissions per field, on its Pro plan at $149 a month. Softr still lists field-level permissions as coming soon in its own docs, so the workaround there is pre-filtering a view in Airtable. Airtable Interfaces let you choose fields per interface, but everyone who opens one needs an Airtable seat.
CollabPortals gives you all four per-field settings, per role, on the $10 plan, with your data staying in Airtable.
Get Started
Open a portal, pick a table, and the Field Permissions list is on its Access tab. Drag the handles to set the order, and use the four switches per field. The Field Permissions doc covers the combinations in detail.
Update, September 2026: the field list has moved to its own Fields tab, next to Access. A table can now have more than one page, and each page has its own field order, so "one order per table" above now means one order per page.
New here? Start a portal and connect your Airtable base first.

About the author
Matt Shepherd
Founder, CollabPortals
Matt is the founder of CollabPortals. A software engineer and Airtable power user who kept running into the same frustration: no easy way to give external users a simple and secure view to edit their data. He built CollabPortals as the lightweight solution to that problem, allowing you to set up a secure, permissioned portal in a few clicks.
Related reading
Clients
Give your clients secure, branded access to their project data in Airtable. No extra seats, no code, no complex setup, just share a link.
Use caseCRM
Give your clients a branded portal to view their account data, deals, contacts, sites, activity, directly from your Airtable CRM. No extra seats, no code.
Use caseInsurance
Give agents, brokers, and clients a secure portal to submit applications, track policy status, and manage underwriting data, powered by your Airtable base.
Use caseContractor Compliance
Give contractors and vendors a self-service portal to upload and renew their insurance, license, and tax documents, with expiry tracking, all powered by your Airtable base.